sqoop

Concept

Sqoop: sq are the first two of “sql”, oop are the last three of “hadoop”. It transfers bulk data between hdfs and relational database servers. It supports:

  • Full Load
  • Incremental Load
  • Parallel Import/Export (throught mapper jobs)
  • Compression
  • Kerberos Security Integration
  • Data loading directly to HIVE

Sqoop cannot import .csv files into hdfs/hive. It only support databases / mainframe datasets import.

Architecture

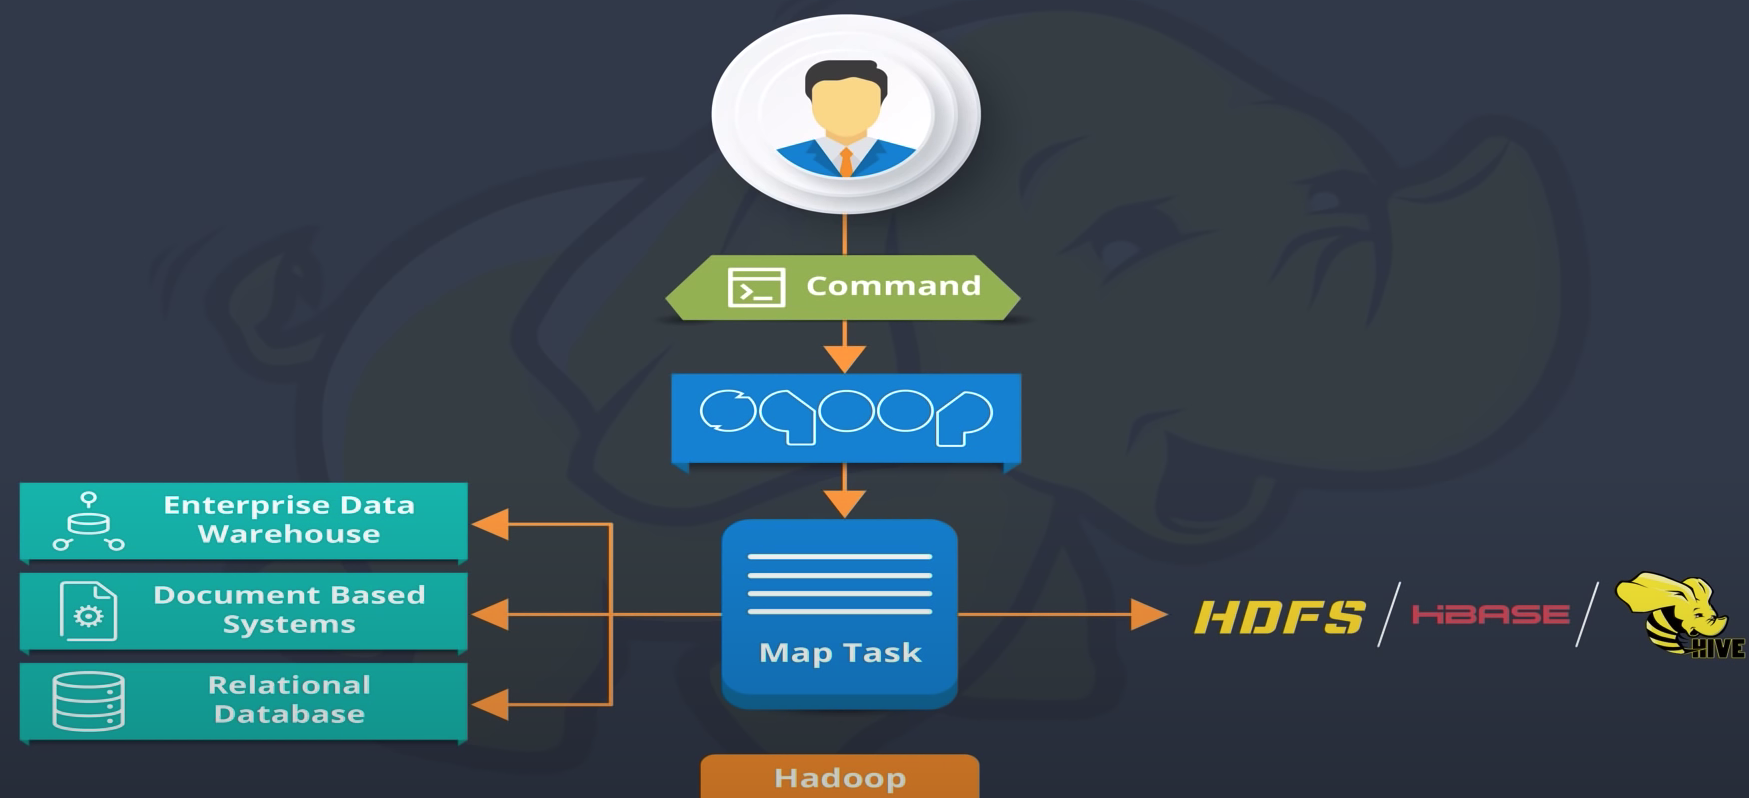
Sqoop provides CLI, thus you can use a simple command to conduct import/export.

The import/export are executes in fact through map tasks.
sqoop-20201110134912159.png

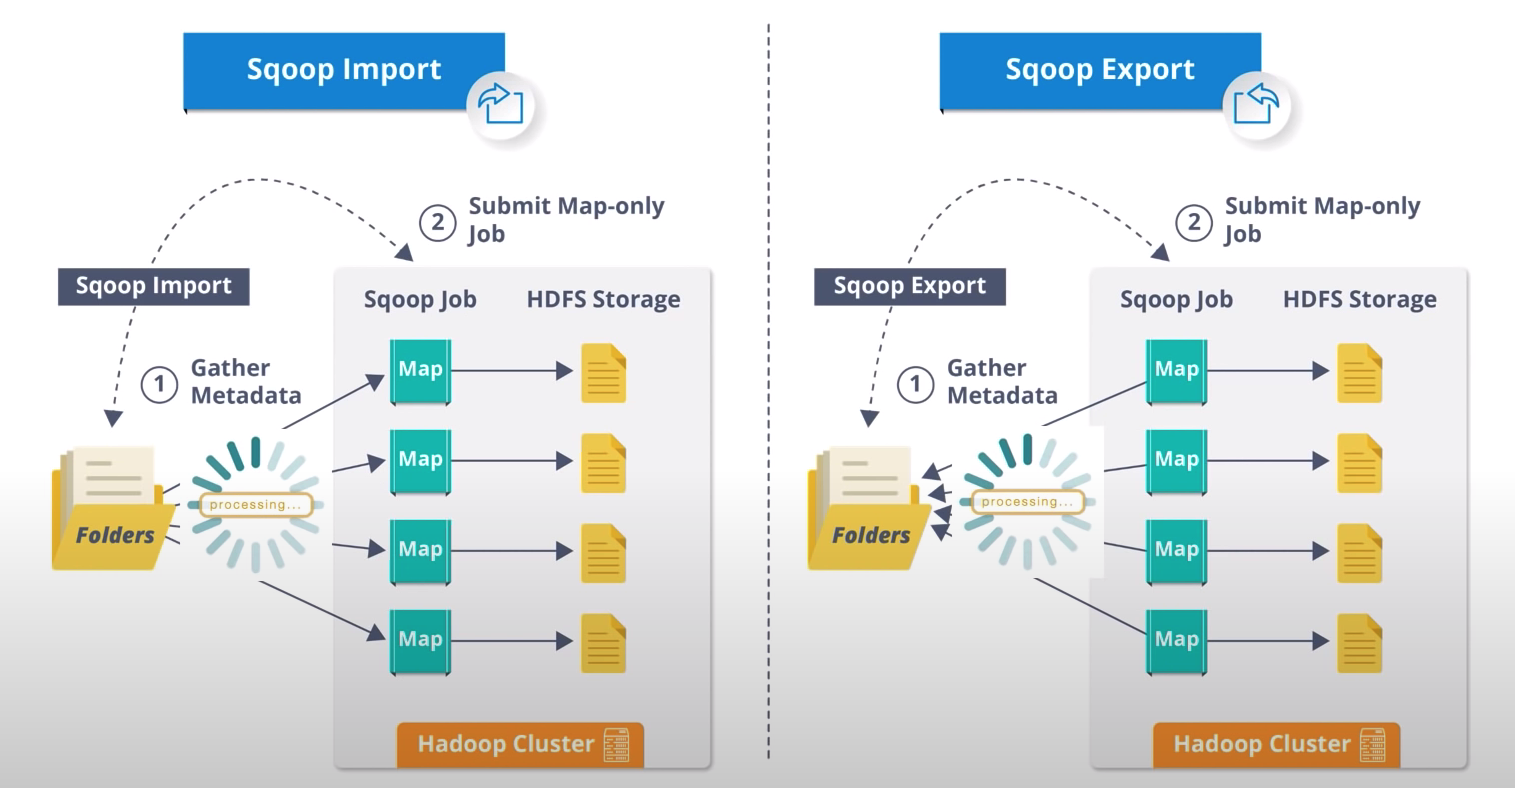
When Import from DB:

  • it split to some map tasks. And each map task will connect to DB, and fetch some rows/tables, and write it to a file into HDFS

When export to DB:

  • it also split to some map tasks. And each map task will fetch a HDFS file, and write each record in the file as a row by specified delimiter to some table.
sqoop-20201110135220097.png

Sqoop v.s. Spark jdbc

sqoop uses mapreduce technique, while spark is a revolutionary engine to replace mapreduce technique with its in-memory execution and DAG smartness. Thus Spark jdbc is way faster than sqoop.

  1. You can combine all the read, transform and write operations into one script/program instead of reading it separately through SQOOP in one script and then doing transformation and write in another.
  2. You can define a new split column on the fly (using functions like ORA_HASH) if you want the data to be partitioned in a proper way.
  3. You can control the number of connection to the database. Increasing the number of connection will surely speed up your data import.

Common Commands

1
2
3
4
5
6
7
8
9
10
11
$  sqoop import \
--connect jdbc:mysql://<ipaddress>/<database name>
--table <my_table name>
--username <username_for_my_sql> --password <password>
--target-dir <target dir in HDFS where data needs to be imported>

$ sqoop export \
--connect jdbc:mysql://<ipaddress>/<database name>
--table <my_table name>
--username <username_for_my_sql> --password <password>
--export-dir <target dir in HDFS where data needs to be exported>

Incremental Import

增量导入时,sqoop 需要识别到增量数据,有三种方法:

  1. 根据自增字段识别新数据(append 模式):可以直接识别新数据并导入到 hive 中
  2. 根据修改时间识别新数据(lastmodified 模式):要求这个字段会随数据的改变而改变,但是似乎只能导入到 hdfs 中,不能直接导入到 hive 中。导入时,可以通过制定--merge-key id 来按 id 字段进行合并,或者之后通过 sqoop merge 功能单独运行
  3. 根据 where 或 query 识别新数据:可能之后只能通过 sqoop merge 来 merge 数据

目前 sqoop 导入时不能识别删除数据,都需要通过其他方式来解决(对比数据,或者数据上有 delete 标识符时,通过 Incrementally Updating a Table 来实现)

append 模式

1
2
3
4
5
6
7
8
9
10
11
12
13
14
15
16
17
18
19
sqoop import \
--connect jdbc:mysql://192.168.33.2:3306/doit_mall \
--username root \
--password root \
--table oms_order \
--target-dir /tmp/query \
--hive-import \
--hive-table doit12.oms_order \
--as-textfile \
--fields-terminated-by ',' \
--compress \
--compression-codec gzip \
--split-by id \
--null-string '\\N' \
--null-non-string '\\N' \
--incremental append \ # append 模式
--check-column id \ # 自增字段
--last-value 22 \ # 自增字段的 last value
-m 2

lastmodified 模式

1
2
3
4
5
6
7
8
9
10
11
12
13
14
15
16
17
sqoop import \
--connect jdbc:mysql://192.168.33.2:3306/dicts \
--username root \
--password root \
--table doit_stu \
--target-dir /doit_stu/2020-02-09 \
--as-textfile \
--fields-terminated-by ',' \
--split-by id \
--null-string '\\N' \
--null-non-string '\\N' \
--incremental lastmodified \ # lastmodified 模式
--check-column update_time \ # 时间字段
--last-value '2020-02-09 23:59:59' \ # 上一次获取的数据时间
--fields-terminated-by ',' \
--merge-key id \ #按照id字段进行合并
-m 1

条件查询

这里写的都是全量导入 hive。如果要增量,只能先导入到 hdfs,然后再做 merge

–where

1
2
3
4
5
6
7
8
9
10
11
12
13
14
15
16
17
18
sqoop import \
--connect jdbc:mysql://192.168.33.2:3306/doit_mall \
--username root \
--password root \
--table oms_order \
--hive-import \
--hive-table doit12.oms_order \
--delete-target-dir \
--as-textfile \
--fields-terminated-by ',' \
--compress \
--compression-codec gzip \
--split-by id \
-m 2 \
--null-string '\\N' \
--null-non-string '\\N' \
--where "delivery_company is null" \ # filter condition
--hive-overwrite

–query

1
2
3
4
5
6
7
8
9
10
11
12
13
14
15
16
17
18
sqoop import \
--connect jdbc:mysql://192.168.33.2:3306/doit_mall \
--username root \
--password root \
--target-dir /tmp/query \ # sqoop 导入数据到 hive,本质就是先将数据导入到 hdfs,然后再去 hive 数据库创建元数据。这里需要手动指定中间临时目标目录(不太清楚为啥)
--hive-import \
--hive-table doit12.oms_order \
--delete-target-dir \
--as-textfile \
--fields-terminated-by ',' \
--compress \
--compression-codec gzip \
--split-by id \
--null-string '\\N' \
--null-non-string '\\N' \
--hive-overwrite \
--query "select id,member_id,order_sn,total_amount,pay_amount,status from oms_order where status=4 and \$CONDITIONS" \ # 查询语句,也支持复杂查询
-m 2

运行 sqoop action

在数据接入时,特别是连接数据库增量导入数据时,这种周期性任务的执行,有很多种方式:

  1. 写一个 long running 脚本,不断执行增量 import
  2. 采用 Oozie 等调度工具来运行